Skip to content
New issue

Have a question about this project? Sign up for a free GitHub account to open an issue and contact its maintainers and the community.

By clicking “Sign up for GitHub”, you agree to our terms of service and privacy statement. We’ll occasionally send you account related emails.

Already on GitHub? Sign in to your account

Dual Loop PID #5972

Closed
wants to merge 4 commits into from
Closed

Dual Loop PID #5972

wants to merge 4 commits into from

Conversation

rodrigo2019
Copy link

The idea behind the following PR is to have a more accurate bed surface temperature

Usually users who have big and thick beds have an offset between the bed surface and the thermistor temperature located on the heater, also they usually need to wait some time for the bed surface to reach the thermal equilibrium with the heater.

This PR allow the user set a new control algo that uses two sensors, one for the bed surface and one for the heater.

This new algorithm uses two PID loops, one for controlling the heater and one for controlling the bed surface, it works using the minimum control values beetwen the both PID loops.
The main target for the heater will be always the bed surface, the maximum heater temperature is set on the heater section.

Here we can see a more detailed simulation:
image

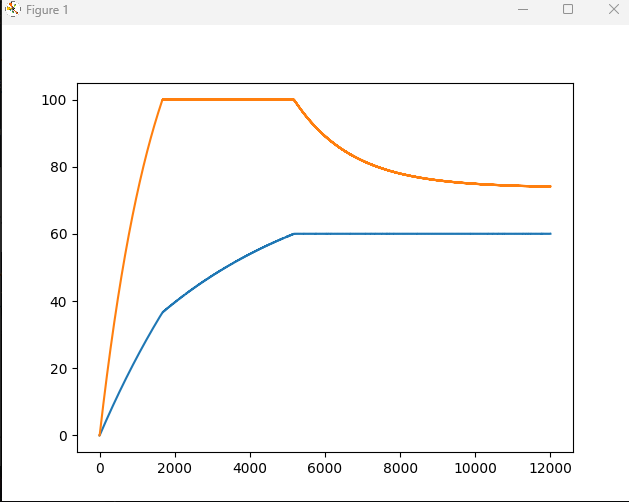
The temperature on the heater (orange curve) was set to not exceed 100ºC while the bed surface target was on 60ºC

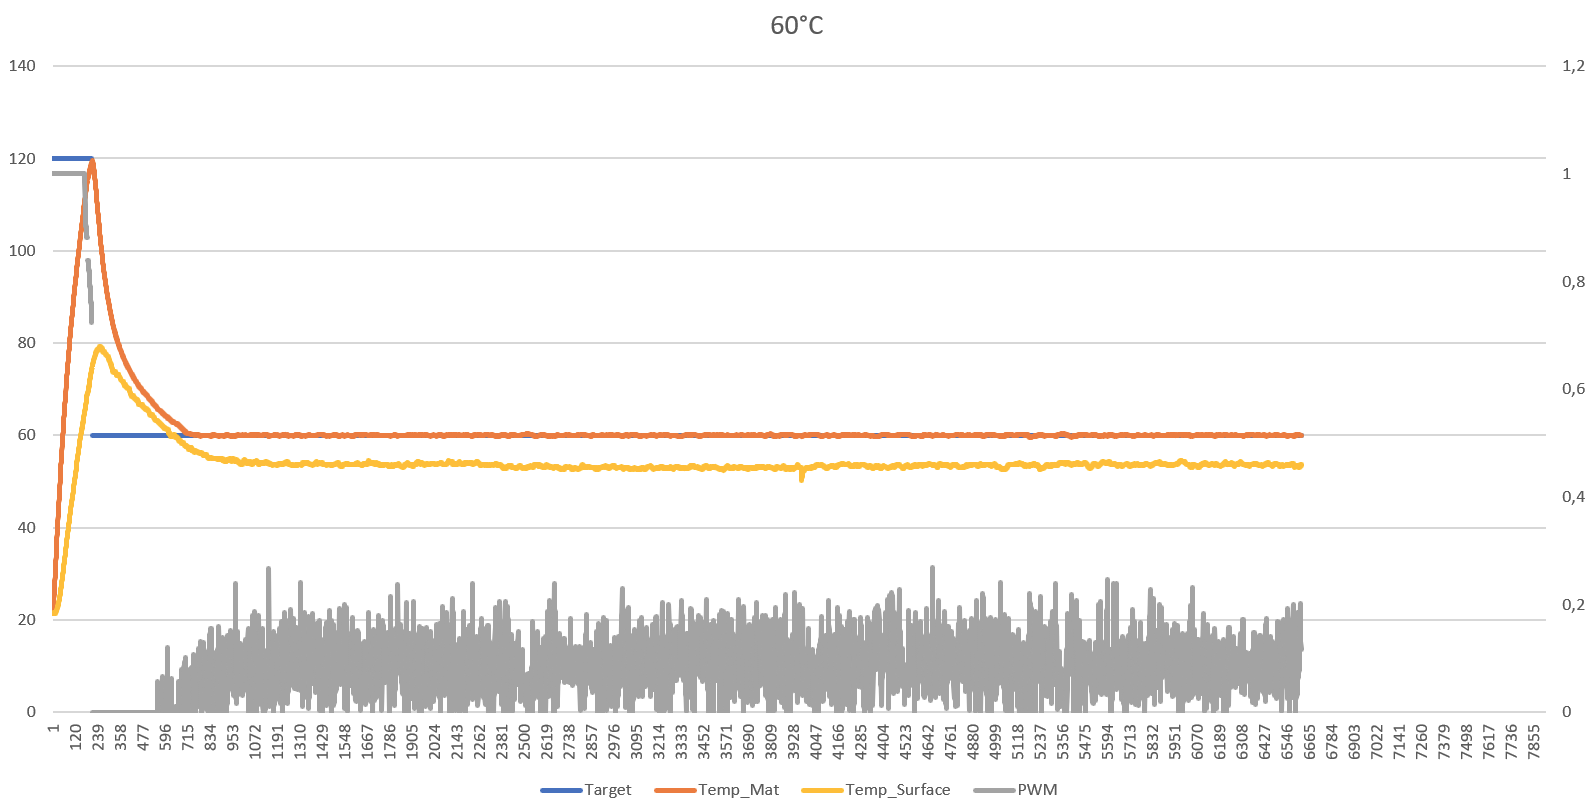
And here we can see a practical situation on my printer, which have a bed size 350mmx350mmx8mm. In this situation the same parameters was set as in the simulation

curva_dualpid
curva_dualpid2
image

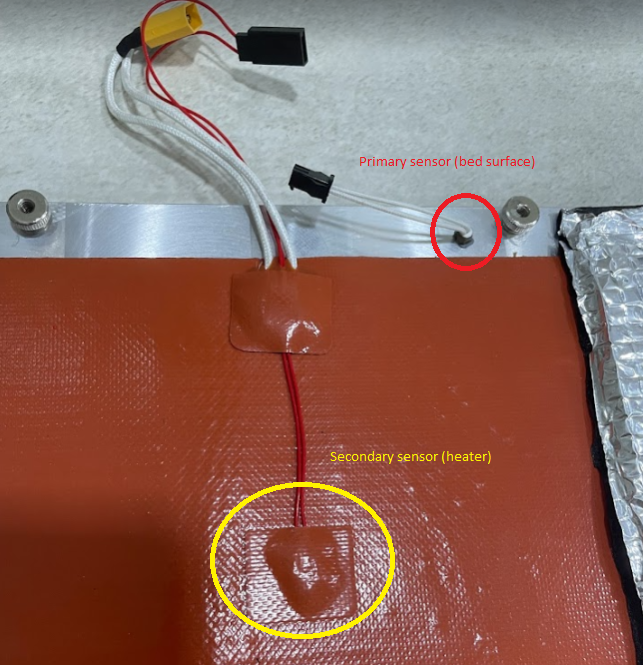
Here is how I setup the sensors in my bed:
image

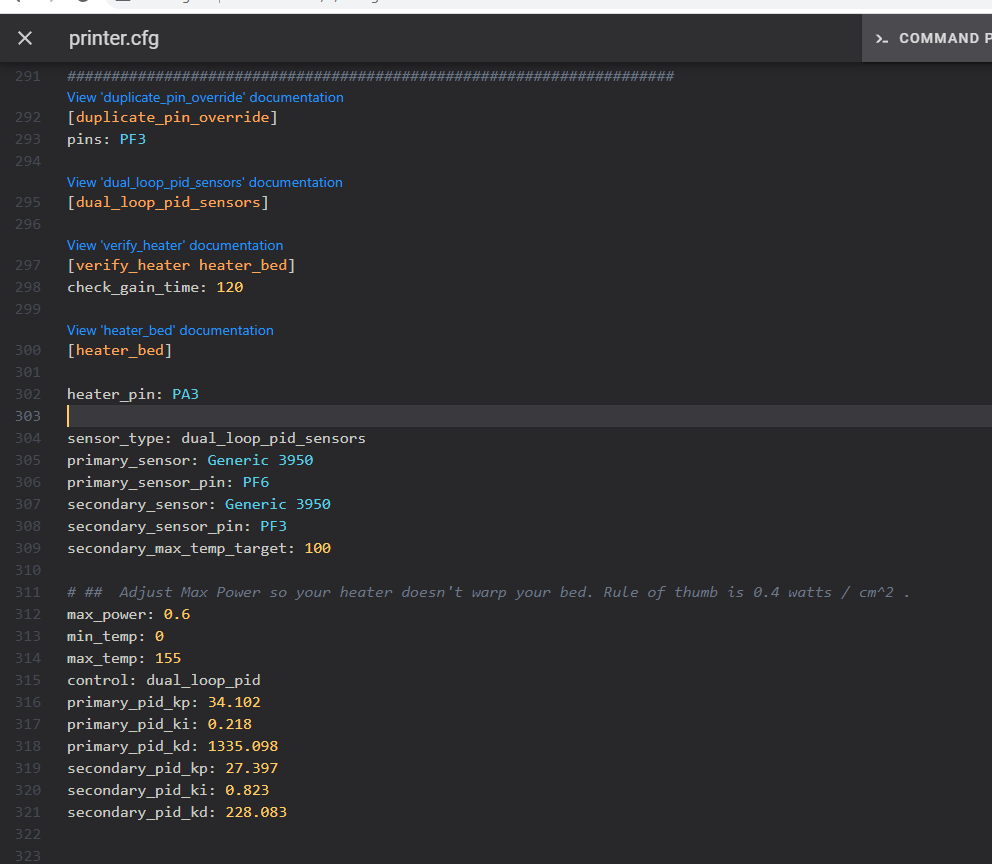
and here how my configuration looks like now:
image

@The-Futur1st
Copy link

First of all, you have to consider support for other types temperature sensors, like MAX31865. Second thing, code looks "dirty", see "sensor_type_arg_name='sensor_type', sensor_pin_arg_name='sensor_pin'", it looks more like hacks rather than something suitable for master branch. You should consider to rewrite it from scratch in more generic way.

@rodrigo2019
Copy link
Author

Any tips how I can instantiate two equals sensors in same section? As they look for the same arguments in the section

@rodrigo2019
Copy link
Author

Maybe as I'm not creating a new sensor, just putting more than one together, I should create a cluster of PrinterSensorGeneric and use it to get the temperature from each sensor set in the PrinterSensorGeneric class?

@The-Futur1st
Copy link

The-Futur1st commented Jan 10, 2023

I am not Kevin, so I can't provide the "right" solution for your case, but from my point of view it would be more interesting not to change heater section. For example we already have interface to lookup heater in heaters.py

def lookup_heater(self, heater_name):
        if heater_name not in self.heaters:
            raise self.printer.config_error(
                "Unknown heater '%s'" % (heater_name,))

We can provide the same interface for sensors

    def lookup_sensor(self, sensor_name):
        if sensor_name not in self.sensors:
            raise self.printer.config_error(
                "Unknown sensor '%s'" % (sensor_name,))
        return self.sensors[sensor_name]
    def setup_sensor(self, config):
        if not self.have_load_sensors:
            self.load_config(config)
        sensor_type = config.get('sensor_type')
        if sensor_type not in self.sensor_factories:
            raise self.printer.config_error(
                "Unknown temperature sensor '%s'" % (sensor_type,))
        if sensor_type == 'NTC 100K beta 3950':
            config.deprecate('sensor_type', 'NTC 100K beta 3950')
        sensor = self.sensor_factories[sensor_type](config)
        sensor_name = config.get_name().split()[-1]
        if sensor_name in self.sensors:
            raise config.error("Sensor %s already registered" % (sensor_name,))
        # Create sensor
        self.sensors[sensor_name] = sensor
        return sensor

And for example just get it by it's name in our init method

self.secondary_sensor_name = config.get("secondary_sensor_name")
pheaters = self.printer.load_object(config, 'heaters')
self.secondary_sensor = pheaters.lookup_sensor(self.secondary_sensor_name)
self.secondary_sensor.setup_callback(self.temperature_callback)

in this case we will have to modify "setup_callback" method to work with more than one callback.

#---------------------------------------------------------------------------------
[temperature_sensor SecondaryBedSensor]
sensor_type: MAX31865
sensor_pin: max31865_cs
spi_bus: spi1
rtd_nominal_r: 1000
rtd_reference_r: 4300
rtd_num_of_wires: 2
min_temp: 0
max_temp: 120

#---------------------------------------------------------------------------------
[heater_bed]
heater_pin: heater0_pin

sensor_type: Generic 3950
sensor_pin: bed_sensor_pin
min_temp: 0
max_temp: 120
secondary_sensor_name: SecondaryBedSensor

@rodrigo2019
Copy link
Author

Thank you, your example helped me.
The main issue following your example is to extract the temperature information from the sensors objects, one option as you said is to change the setup callback to work with more than one callback, for doing that we must re-implement the setup_callback method it in each sensor. Another similar ideia is to expose the temperature variable in the objects, some sensors like BME280 already have this value exposed by "self.temp", but PrinterADCtoTemperature for example don't have
Maybe for implementing one of these ideas would be a good approach create an abstract Sensor class inhereted by all sensors, like:

from abc import ABC, abstractmethod


class Sensor(ABC):
    def __init__(self, config):
        self.printer = config.get_printer()
        self._temp = self.min_temp = self.max_temp = 0.0
        self._callbacks = []
        ...

    def get_temp(self):
        return self._temp

    @abstractmethod
    def setup_minmax(self, min_temp, max_temp):
        pass

    def setup_callback(self, cb):
        self._callbacks.append(cb)

Another idea based on yours, is to load the entire temperature_sensor intead just the sensor:

def setup_heater(self, config, gcode_id=None):
    heater_name = config.get_name().split()[-1]
    if heater_name in self.heaters:
        raise config.error("Heater %s already registered" % (heater_name,))
    # Setup 1st sensor
    sensor = self.setup_sensor(config)
    # Setup 2nd sensor
    secondary_sensor_name = config.get('secondary_sensor_name', None)
    if secondary_sensor_name is not None:
        full_name = "temperature_sensor " + secondary_sensor_name
        secondary_sensor = self.printer.lookup_object(full_name)
    else:
        secondary_sensor = None
    # Create heater
    self.heaters[heater_name] = heater = Heater(config, sensor, secondary_sensor)
    self.register_sensor(config, heater, gcode_id)
    self.available_heaters.append(config.get_name())
    return heater

Also in the Heater class we would have a new sensor, because for now the main idea is to use with the heater bed, but it can be useful for a heated chamber for example.

@dewi-ny-je
Copy link

dewi-ny-je commented Jan 26, 2023

This is very useful in principle. I was thinking about a different solution, with a thermistor touching the bed and mounted inside a cork (which insulates from air perfectly), used with a macro to determine the time for the print to actually start, but a dual PID with a thermistor on the bed itself is of course better if nothing is on top of the aluminium (I have glass).

  1. Do you get faster heating times compared to the normal single PID?
  2. Can you get rid of the overshoot I see in the screenshot?

@KevinOConnor
Copy link
Collaborator

Thanks. Certainly seems interesting, but as high-level feedback, I'm not sure this is a good candidate for the master Klipper branch. This change would add notable config complexity and it isn't clear to me that there would be a sizeable number of people that would perform the research and reconfiguration necessary to utilize it.

To be clear, it does seem interesting. You might want to consider opening a new topic on Klipper Discourse to gather feedback from other users, and to gather their testing feedback.

-Kevin

@Sineos
Copy link
Collaborator

Sineos commented Jan 27, 2023

I'm not sure this is a good candidate for the master Klipper branch.

FWIW, my printer and also the higher end designs (Voron, Railcore etc) typically use silicon heating mats attached to a MIC aluminum base.
E.g. I'm using between 6mm and 8mm MIC plates on my printers with 220V heating mats and a thermal power of around 0.9W per square centimeter. What I'm seeing:

  • Fast heat up (2-3 minutes) on the heating mat thermistor
  • Time-wise a huge delay on the printing surface until the temperature migrates through the MIC plate, the magnetic sheet and the spring steel
  • Temperature-wise a delta of around 10°C (Bed target 80°C) between the heating mat thermistor and the actual printing surface.
  • I have gone through various trials of placing the thermistor that controls the PID loop but the results were not satisfying

If my understanding of this PR is correct, it would considerably improve heating up times, since

  1. A much higher temperature is "pushed" into the system during heating up
  2. The delta between target temperature and actual printing-surface-temperature will be significantly reduced (This can be of course worked around by just setting the target higher, which I do today)

I think it is a very valuable approach and would be happy to see such an option in Klipper.

Edit:
As for the potential user base:

  • Folks being able to build and setup such printer should be able to deal with dialing it in.
  • The user-base of such printer is probably already quite high and constantly growing
  • "Consumer printers" with standard (PCB type) heat beds are anyway not affected since the design probably does not allow for this second thermistor (also the effect might not be as significant as with the MIC/magnetic sheet/spring steel setups)

@zellneralex
Copy link
Contributor

zellneralex commented Jan 27, 2023

@KevinOConnor as that would benefit many large printer with thick aluminum plates like the Voron V2 I am sure the community would find ways to get the research for the average user to a minimum.

BTW RRF has that features for years. Setting it up is quit heavy but user are able to manage it

; Monitors & Limits
M143 H0 P1 T0 A2 S130 C0                     ; Regulate (A2) bed heater (H0) to have pad sensor (T0) below 110°C. Use Heater monitor 1 for it
M143 H0 P2 T0 A0 S135 C0                     ; Fault (A0) bed heater (H0) if pad sensor (T0) exceeds 135°C. Use Heater monitor 2 for it
M143 H0 P0 S120                            ; Set bed heater max temperature to 120°C, use implict monitor 0 which is implicitly configured for heater fault
M143 H1 S400                                  ; set temperature limit for heater 1 to 275C

Do not ask me what all that means I ask a RRF user in the German Voron community to provide it to me.

https://docs.duet3d.com/en/User_manual/Reference/Gcodes#m143-maximum-heater-temperature

I personally also experimented with using the external mounted thermistor as the control thermistor for the heater and the thermistor at the silicon mate only as a safe gate to get the mate not heating too much. But was not able to get that to work reliable without modifying Klipper.

so the PR would be really appreciated.

@KevinOConnor
Copy link
Collaborator

Thanks for the feedback.

FWIW, I also have a Voron2 with two thermistors monitoring bed temperature ( https://github.com/KevinOConnor/voron2-mods/blob/master/bed/bed.md ). So I understand what is being reported.

In case anyone is curious, I currently use the thermistor on the bed heater for the PID, my PRINT_START macro sets a high bed target temperature during initial heating, it uses TEMPERATURE_WAIT on the bed plate thermistor, and then lower the target temperature. This provides a heating curve similar to those shown at the top of this PR. As others have observed, during printing there is a reliable static offset between the heater thermistor and the bed plate thermistor.

My observation is that there are several different ways to handle this type of bed setup. Both with code changes and without code changes. I think more feedback (and more user test results) would be needed before it would make sense to merge a change into Klipper. I don't think enough people will see this PR to get to that point. I think Klipper Discourse is a better place for that discussion and for gathering feedback.

-Kevin

@Sineos
Copy link
Collaborator

Sineos commented Jan 28, 2023

it uses TEMPERATURE_WAIT on the bed plate thermistor, and then lower the target temperature.

Just whipped this up into a mock-up and indeed it is quite close:
image

My observations (on this printer / no enclosure / 6mm MIC / 21°C ambient temperature):

  • As the bed surface is not in the PID loop, the overshoot in quite considerable and takes quite some time to drop back to the target temperature
  • The (stable delta) needs to be manually compensated
  • Delta needs to be dialed in for various bed temperatures, i.e. the delta for 60°C target is around 6°C, for 100°C target it is nearly 24°C (granted: on a non enclosed printer, it hardly makes sense to print materials that need 100°C bed temperature. So just to illustrate the logic)

It is a solution but the PID controlled one has its advantages I would think.

@KevinOConnor
Copy link
Collaborator

KevinOConnor commented Jan 28, 2023

As the bed surface is not in the PID loop, the overshoot in quite considerable and takes quite some time to drop back to the target temperature

FWIW, it's easy to tweak the TEMPERATURE_WAIT on the bed plate thermistor to avoid overshoot.

In case anyone is curious, here's my macro:

[gcode_macro start_print_abs]
gcode:
    {% set BED_TEMP = 105 %}
    {% set EXTRUDER_TEMP = 245 %}
    {% set BED_HEAT = 115 %}
    {% set WAIT_CHAMBER_TEMP = 43 %}
    {% set WAIT_PLATE_TEMP = 95 %}
    # Prep
    G90                 ; absolute positioning
    # Warm chamber
    M104 S1
    M140 S{BED_HEAT}    # Set bed to heat chamber
    G1 X125 Y100 Z20 F800
    M106 S255         # Turn on layer cooling fan to distribute heat
    TEMPERATURE_WAIT sensor="temperature_sensor chamber" minimum={WAIT_CHAMBER_TEMP}
    TEMPERATURE_WAIT sensor="temperature_sensor bed_plate" minimum={WAIT_PLATE_TEMP}
    # Heat extruder
    M106 S0
    G1 X5 Y5 Z5 F4000
    G1 Z0.25 F400
    M140 S{BED_TEMP}
    M109 S{EXTRUDER_TEMP} # Wait for extruder temp
    M190 S{BED_TEMP}    # Wait for bed temp
    G92 E0

-Kevin

@Sineos
Copy link
Collaborator

Sineos commented Jan 28, 2023

You are right. I mislead myself graphically. In fact my overshoot was only 4°C. This is what I have been using to play around:

[gcode_macro TEMP_TEST]
gcode:
    {% set BED_TEMP = params.BED_TEMP|default(60)|float %}
    # Exceed target temperature by 25% to heat-soak the bed
    {% set soak_temp = BED_TEMP + BED_TEMP * 0.25|float %}
    { action_respond_info('Soak temp: ' ~ soak_temp) }
    # Make sure not to exceed max bed_temperature (120°C)
    {% if soak_temp > 120.0 %}
        {% set soak_temp = 120.0 %}
        { action_respond_info('Soak temp capped at 120C') }
    {% endif %}
    # Wait for bed surface sensor to reach the soak temp +/- 0.2°C
    SET_HEATER_TEMPERATURE HEATER=heater_bed TARGET=120
    TEMPERATURE_WAIT SENSOR="temperature_sensor bed_surface" MINIMUM={soak_temp - 0.2} MAXIMUM={soak_temp + 0.2}
    SET_HEATER_TEMPERATURE HEATER=heater_bed TARGET={BED_TEMP}
    TEMPERATURE_WAIT SENSOR="temperature_sensor bed_surface" MINIMUM={BED_TEMP - 0.2} MAXIMUM={BED_TEMP + 0.2}

Edit: The safeguard against too high soak_temp is in fact unneeded. In an earlier version I was experimenting with setting SET_HEATER_TEMPERATURE HEATER=heater_bed TARGET=120 dynamically.

@rodrigo2019
Copy link
Author

This is very useful in principle. I was thinking about a different solution, with a thermistor touching the bed and mounted inside a cork (which insulates from air perfectly), used with a macro to determine the time for the print to actually start, but a dual PID with a thermistor on the bed itself is of course better if nothing is on top of the aluminium (I have glass).

  1. Do you get faster heating times compared to the normal single PID?

Yes, it is noticeable, in my normal conditions my heater can heat up to 150ºc, so for example to reach 100ºc in the surface I can take the advantage from this extra heat.
I don't have these numbers right now, but I can provide for you.

  1. Can you get rid of the overshoot I see in the screenshot?

Unfortunately not, my pid was tuned for 100ºc, so for lower temperature like 60ºc I have a overshoot around 1.5ºC, for a 100ºC target, my overshoot is around 0.1ºC

@rodrigo2019
Copy link
Author

The main point of this PR is to get as close as possible the desired temperature need for printing some material, there is no need to know the offsets between the heater and surface, and that offset sometimes can change because some external factor, like the fans below the bed for heat soak.

After the tips from @The-Futur1st , the implementation got simpler, but I didn't update the documentation after the refactoring.

I didn't know about Klipper Discourse, I will start a discussing there to get the validation from more users.

Thanks you guys

@dewi-ny-je
Copy link

For info: I use the PWM value to define when the bed has actually reached a stable temperature: even after the (only) thermistor reaches it, the PWM takes longer to decrease until it is constant, because there is still heat flowing up.

Of course given the nice macros, I'll change my approach, but I thought it was good to mention it.

Added dual_loop_pid into documentation

Signed-off-by: Rodrigo Andrade <rodrigormda@hotmail.com>
Added an optional sensor into heater class, this sensor can be added from printer.lookup_object method

Signed-off-by: Rodrigo Andrade <rodrigormda@hotmail.com>
ControlDualLoopPID uses two ControlPID class

Signed-off-by: Rodrigo Andrade <rodrigormda@hotmail.com>
ControlAutoTune also tunes ControlDualLoopPID

Signed-off-by: Rodrigo Andrade <rodrigormda@hotmail.com>
@github-actions
Copy link

Thank you for your contribution to Klipper. Unfortunately, a reviewer has not assigned themselves to this GitHub Pull Request. All Pull Requests are reviewed before merging, and a reviewer will need to volunteer. Further information is available at: https://www.klipper3d.org/CONTRIBUTING.html

There are some steps that you can take now:

  1. Perform a self-review of your Pull Request by following the steps at: https://www.klipper3d.org/CONTRIBUTING.html#what-to-expect-in-a-review
    If you have completed a self-review, be sure to state the results of that self-review explicitly in the Pull Request comments. A reviewer is more likely to participate if the bulk of a review has already been completed.
  2. Consider opening a topic on the Klipper Discourse server to discuss this work. The Discourse server is a good place to discuss development ideas and to engage users interested in testing. Reviewers are more likely to prioritize Pull Requests with an active community of users.
  3. Consider helping out reviewers by reviewing other Klipper Pull Requests. Taking the time to perform a careful and detailed review of others work is appreciated. Regular contributors are more likely to prioritize the contributions of other regular contributors.

Unfortunately, if a reviewer does not assign themselves to this GitHub Pull Request then it will be automatically closed. If this happens, then it is a good idea to move further discussion to the Klipper Discourse server. Reviewers can reach out on that forum to let you know if they are interested and when they are available.

Best regards,
~ Your friendly GitIssueBot

PS: I'm just an automated script, not a human being.

@github-actions
Copy link

github-actions bot commented Mar 1, 2023

Unfortunately a reviewer has not assigned themselves to this GitHub Pull Request and it is therefore being closed. It is a good idea to move further discussion to the Klipper Discourse server. Reviewers can reach out on that forum to let you know if they are interested and when they are available.

Best regards,
~ Your friendly GitIssueBot

PS: I'm just an automated script, not a human being.

@github-actions github-actions bot closed this Mar 1, 2023
@dewi-ny-je
Copy link

@rodrigo2019 did you at least do the self-review? did you ask in the Dicourse forum and in Discord whether someone could perform the review for you? it's a pity this feature gets lost.

@rodrigo2019
Copy link
Author

@dewi-ny-je yes, I did a self-review, before the github actions message you can see my force-push updating the documentation e parts of the code.
I also opened a topic in the discourse as suggested: here

And I didn't ask to anybody to review this PR, because of this part in the guideline:
Please do not "ping" any of the reviewers and please do not direct submissions at them. All of the reviewers monitor the forums and PRs, and will take on reviews when they have time to.

@KevinOConnor
Copy link
Collaborator

Thanks for working on this and sharing your results. I do think it is interesting. However, I don't think there is consensus on this feature at this time. So, I think it is best to track the conversation on Discourse instead of github.

-Kevin

@github-actions github-actions bot locked and limited conversation to collaborators Mar 1, 2024
Sign up for free to subscribe to this conversation on GitHub. Already have an account? Sign in.
Projects
None yet
Development

Successfully merging this pull request may close these issues.

None yet

6 participants